You can configure Admin Email Id to send notifications to the users of erwin Data Intelligence Suite (DI Suite). It involves using:
- SMTP settings
- sendmail command
- mailx command
- Custom Command
To configure email settings, follow these steps:
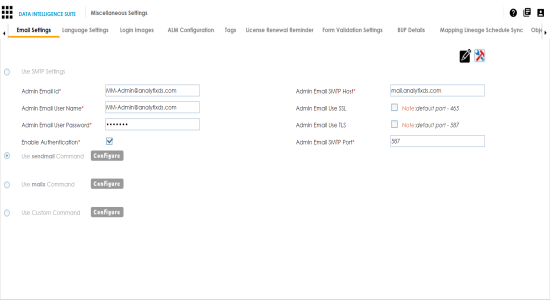
- Go to Application Menu > Miscellaneous > Settings > Miscellaneous.
- Click
 .
. - Use one of the following options:
- Use SMTP Settings
- You can use this option, if your organization is using SMTP server to send outbound emails.
To configure the SMTP Settings, follow these steps:- Select Use SMTP Settings.
- Enter appropriate values in the fields. Fields marked with a red asterisk are mandatory. Refer to the following table for field descriptions.
Field Name
Description
Admin Email Id
Specifies the email id being used to send the notifications.
For example, polydude.alice@gmail.com
Enable Authentication
Specifies whether the SMTP host requires authentication using the Admin Email User Name and Admin Email User Password.
Select the Enable Authentication check box to enable authentication using Admin Email User Name and Admin Email User Password.
Admin Email User Name
Specifies the email id being used to send the notifications.
For example, polydude.alice@gmail.com
Admin Email User Password
Specifies the password to log on the Admin Email Id.
For example, goerwin@1.
Admin Email SMTP Host
Specifies the SMTP host.
For example, smtp.gmail.com
Admin Email Use SSL
Specifies whether SMTP host uses SSL.
Select the Admin Email Use SSL check box if SMTP host uses SSL.
Admin Email Use TLS
Specifies whether SMTP host uses TLS.
Select the Admin Email Use TLS check box if SMTP host uses TLS.
Admin Email SMTP Port
Specifies the SMTP port.
For example, 587.
- Use sendmail Command
- You can use this option, if you are using Linux environment and want to use sendmail command to send email notifications.
- To configure the sendmail command, follow these steps:
- Select Use sendmail Command.
- Click Configure.
The following page appears:
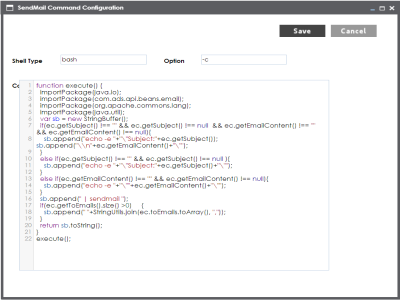
- Configure the sendmail command.
- Click Save.
- The sendmail command is configured.
- Use mailx Command
- Use this option, if you are using Linux environment and want to use mailx command to send email notifications.
- To configure the mailx command, follow these steps:
- Select Use mailx Command.
- Click Configure.
The MailX Command Configuration page appears.
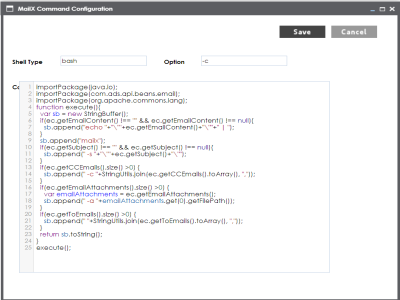
- Configure the mailx command.
- Click Save.
- The mailx command is configured.
- Use Custom Command
- Use this option, if you are using Linux environment and want to use a custom command to send emails.
- To configure a custom command, follow these steps:
- Select Use Custom Command.
- Click Configure.
The Custom Command Configuration page appears.
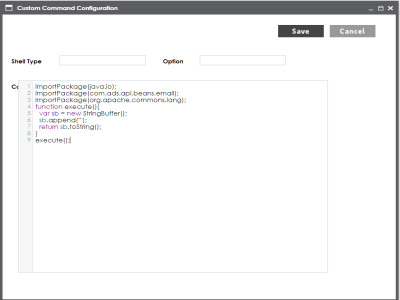
- Configure the custom command.
- Click Save.
- The custom command is configured.
- Click
 .
. - Click
 to test the email settings.
 - Enter appropriate values in the fields. Fields marked with a red asterisk are mandatory. Refer to the following table for field descriptions.
- Click Send.
The Miscellaneous Settings page appears and the Email Settings tab opens.
The Email Settings page appears.
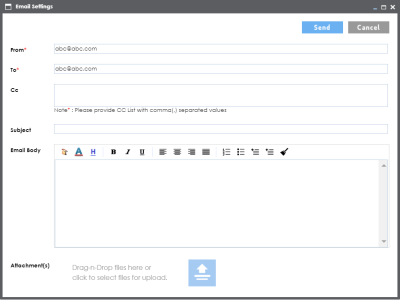
|
Field Name |
Description |
|---|---|
|
From |
Type the Admin Email Id from which you wish to send email notifications. |
|
To |
Type a test email ID to which you want to send email. |
|
CC |
Type email IDs of secondary recipients. |
|
Subject |
Type the subject of the test email. |
|
Email Body |
Type the email body of the test email. |
|
Attachment(s) |
To attach files, drag and drop files or use |
The success message validates your email settings.
|
Copyright © 2020 erwin, Inc.
All rights reserved.
|
|